Android is open source and a fully customizable mobile platform. Android offers a full stack: an operating system, middleware, and key mobile applications.
|

Saturday, April 3, 2010
Advantages of Android platform
Friday, April 2, 2010
Writing your first basic Android application
The purpose with which I started this blog was the problems I faced while writing a basic android application. I found documentation and resources required to create an application quiet tedious.
In case you want to know why this technology is rapidly catching check here the advantages of android.
Getting the basic setup done.
What you require:- An Integearted Development Envoinment aka IDE like eclipse. You may download it from here Get Eclipse
Getting the Android SDK - The second pre-requisite is getting Android SDK which gives the required libraries and platform to develop full fledged android applications. Get Android
1. Prepare your development computer
Read the System Requirements document and make sure that your development computer meets the hardware and software requirements for the Android SDK. Install any additional software needed before downloading the Android SDK. In particular, you may need to install the JDK (version 5 or 6 required) and Eclipse (version 3.4 or 3.5, needed only if you want develop using the ADT Plugin).
2. Download and install the SDK starter package
Select a starter package from the table at the top of this page and download it to your development computer. To install the SDK, simply unpack the starter package to a safe location and then add the location to your PATH.
3. Install the ADT Plugin for Eclipse
If you are developing in Eclipse, set up a remote update site at
Creating your first application
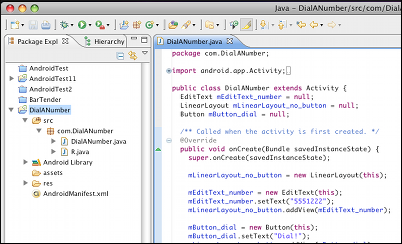
Android Development Demo: “DialANumber”
While I think the Android development examples are not really good and straight forward perhaps some of you come along with them. However, I would like to provide you a very very simple example here on how to write your own first Android program.
This is technically very easy. Once you got Eclipse and Android installed and running on your computer (I use a Mac OS Leopard powered MacBook but you can use a Microsoft Windows XP/Vista/etc. PC as well) you just start Eclipse. Now you just go to “
Now you can start writing and customize the default “Hello World” a.k.a. “Hello Android” app which just shows a text field. If you are really really lazy you could also copy/paste the following code:
import android.app.Activity;
import android.content.Intent;
import android.net.Uri;
import android.os.Bundle;
import android.view.KeyEvent;
import android.view.View;
import android.widget.Button;
import android.widget.EditText;
import android.widget.LinearLayout;
public class DialANumber extends Activity {
EditText mEditText_number = null;
LinearLayout mLinearLayout_no_button = null;
Button mButton_dial = null;
/** Called when the activity is first created. */
@Override
public void onCreate(Bundle savedInstanceState) {
super.onCreate(savedInstanceState);
mLinearLayout_no_button = new LinearLayout(this);
mEditText_number = new EditText(this);
mEditText_number.setText(”5551222″);
mLinearLayout_no_button.addView(mEditText_number);
mButton_dial = new Button(this);
mButton_dial.setText(”Dial!”);
mLinearLayout_no_button.addView(mButton_dial);
mButton_dial.setOnClickListener(new View.OnClickListener() {
public void onClick(View v) {
performDial();
}
});
setContentView(mLinearLayout_no_button);
}
public boolean onKeyDown(int keyCode, KeyEvent event) {
if (keyCode == KeyEvent.KEYCODE_CALL) {
performDial();
return true;
}
return false;
}
public void performDial(){
if(mEditText_number!=null){
try {
startActivity(new Intent(Intent.ACTION_CALL, Uri.parse(”tel:” + mEditText_number.getText())));
} catch (Exception e) {
e.printStackTrace();
}
}//if
}
}
That was quick!
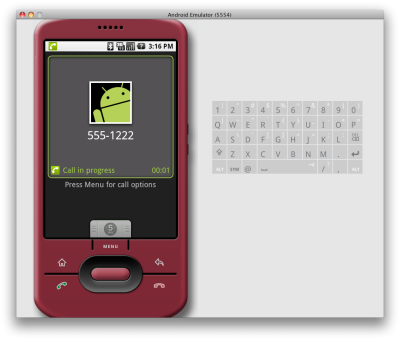
Now you should create a debug runtime configuration which can be done at “Run » Debug Configurations…“. Here you select “Android Application” and press “New“. Enter a name and select the “DialANumber” project. Launching the default Activity might be a good idea as we not know what the f*** it means right now. So just hit “Apply” and “Debug” and the program will be started in the Android simulator. To give you a clue how that looks like here are some screen shots:

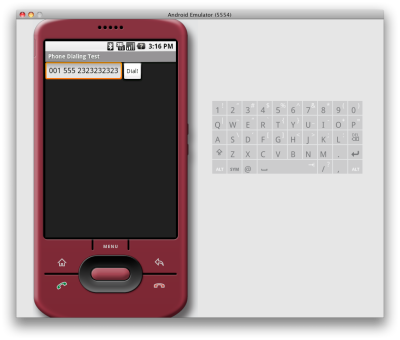
As there is an EditField for the phone number which can be modified you can also enter a new phone number in there. An example of this comes here:
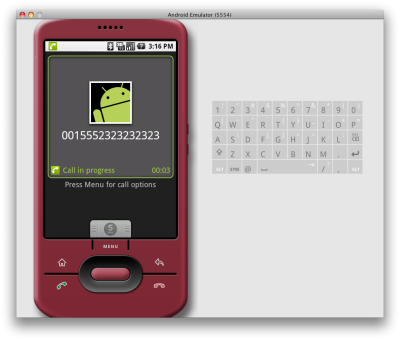
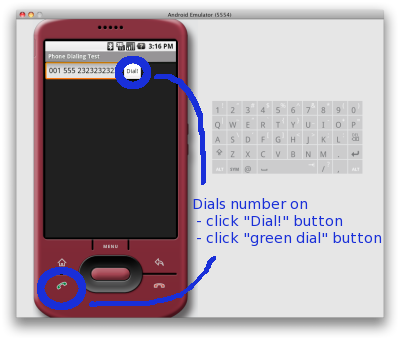
As everyone can see we are able to dial the number in two different ways:
Suggestions are welcome!
In case you want to know why this technology is rapidly catching check here the advantages of android.
Getting the basic setup done.
What you require:- An Integearted Development Envoinment aka IDE like eclipse. You may download it from here Get Eclipse
Getting the Android SDK - The second pre-requisite is getting Android SDK which gives the required libraries and platform to develop full fledged android applications. Get Android
1. Prepare your development computer
Read the System Requirements document and make sure that your development computer meets the hardware and software requirements for the Android SDK. Install any additional software needed before downloading the Android SDK. In particular, you may need to install the JDK (version 5 or 6 required) and Eclipse (version 3.4 or 3.5, needed only if you want develop using the ADT Plugin).
2. Download and install the SDK starter package
Select a starter package from the table at the top of this page and download it to your development computer. To install the SDK, simply unpack the starter package to a safe location and then add the location to your PATH.
3. Install the ADT Plugin for Eclipse
If you are developing in Eclipse, set up a remote update site at
https://dl-ssl.google.com/android/eclipse/. Install the Android Development Tools (ADT) Plugin, restart Eclipse, and set the "Android" preferences in Eclipse to point to the SDK install location. For detailed instructions, see ADT Plugin for Eclipse.Creating your first application
Android Development Demo: “DialANumber”
While I think the Android development examples are not really good and straight forward perhaps some of you come along with them. However, I would like to provide you a very very simple example here on how to write your own first Android program.This is technically very easy. Once you got Eclipse and Android installed and running on your computer (I use a Mac OS Leopard powered MacBook but you can use a Microsoft Windows XP/Vista/etc. PC as well) you just start Eclipse. Now you just go to “
New » Project... » Android » Android Project...” and enter the required data. Once you are done the result might look like this:Now you can start writing and customize the default “Hello World” a.k.a. “Hello Android” app which just shows a text field. If you are really really lazy you could also copy/paste the following code:
package com.DialANumber;import android.app.Activity;
import android.content.Intent;
import android.net.Uri;
import android.os.Bundle;
import android.view.KeyEvent;
import android.view.View;
import android.widget.Button;
import android.widget.EditText;
import android.widget.LinearLayout;
public class DialANumber extends Activity {
EditText mEditText_number = null;
LinearLayout mLinearLayout_no_button = null;
Button mButton_dial = null;
/** Called when the activity is first created. */
@Override
public void onCreate(Bundle savedInstanceState) {
super.onCreate(savedInstanceState);
mLinearLayout_no_button = new LinearLayout(this);
mEditText_number = new EditText(this);
mEditText_number.setText(”5551222″);
mLinearLayout_no_button.addView(mEditText_number);
mButton_dial = new Button(this);
mButton_dial.setText(”Dial!”);
mLinearLayout_no_button.addView(mButton_dial);
mButton_dial.setOnClickListener(new View.OnClickListener() {
public void onClick(View v) {
performDial();
}
});
setContentView(mLinearLayout_no_button);
}
public boolean onKeyDown(int keyCode, KeyEvent event) {
if (keyCode == KeyEvent.KEYCODE_CALL) {
performDial();
return true;
}
return false;
}
public void performDial(){
if(mEditText_number!=null){
try {
startActivity(new Intent(Intent.ACTION_CALL, Uri.parse(”tel:” + mEditText_number.getText())));
} catch (Exception e) {
e.printStackTrace();
}
}//if
}
}
That was quick!
Now you should create a debug runtime configuration which can be done at “Run » Debug Configurations…“. Here you select “Android Application” and press “New“. Enter a name and select the “DialANumber” project. Launching the default Activity might be a good idea as we not know what the f*** it means right now.
As there is an EditField for the phone number which can be modified you can also enter a new phone number in there. An example of this comes here:
As everyone can see we are able to dial the number in two different ways:
- Hit the “Dial!” button next to the input field.
- Hit the “green dial” button on the bottom of the device.
Suggestions are welcome!
Subscribe to:
Posts (Atom)